Practical guidance on simple conservation issues.
The information on these pages is for guidance only we do not accept responsibility as a result of any person carrying out any works according to the advice contained in this web site. Always follow Health and Safety measures described on products, tools and materials. Jackfield Conservation Studio and TACS are not responsible for the work which you do, the responsibility is yours and yours alone!
Safe removal of damaged historic tile from walls or floor
This process will assist in aiding removal of damaged historic tile in readiness for replacement with new, without incurring further damage to other surrounding historic tile in the process.
The use of uncontrolled impact with a hammer and chisel will cause shock waves to run through the ceramic at random thereby causing fractures to run in any direction, often across cement grout lines, and into the adjacent tile. This should be avoided.
Grouting material in historic tile schemes, dating from the Victorian era, is almost always made up of the same cement based mortar used to fix the tiles to the substrate, it is therefore usually very strong and will have bonded adjacent tiles together to the extent that they have, to all intents and purposes, become one object.
It follows then that the damaged tile must first be separated from its neighbours, before any shock waves have the opportunity to cross the grout line.
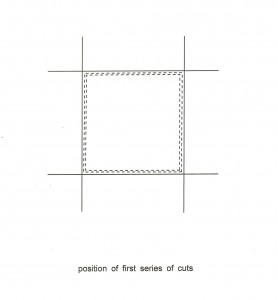
Using a small hand held angle grinder fixed with a diamond cutting blade, 115mm or 125mm in diameter, cut width of 1.2mm (or similar) make cuts to the depth of the tile around the perimeter, at a distance of 5mm inside the grout line, avoid going closely into the corners as any overrun of the cut will damage the next tile. See Fig. 1.
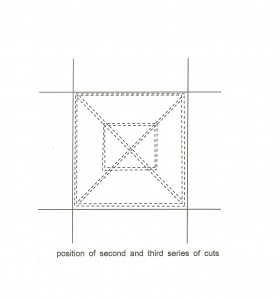
Make a second series of cuts to the same depth diagonally across the tile. See Fig. 2.
Make a third series of cuts across each of these diagonals. See Fig. 2.
Taking a flat two inch cold chisel and a hammer starting at the centre of the tile and working outwards begin to knock away all of the parts of the tile until all that remains is the 5mm. of tile which is at the edge. Change to a one inch chisel with a thin blade and carefully tap along the grout line with the chisel at 90 degrees to the tile face. The remaining tile should fall away.
If more depth space is required on the now revealed cement bed, because the replacement tile is either of the same thickness or thicker than the original, then use the same method for removing excess concrete.
Do not be tempted to cut along the grout line, as this will always lead to damaged edges of the adjacent tile. The saw blade will automatically find the weakest part of the groove, taking at least 1mm of the adjacent tile away and thus creating an overall space which is larger than the replacement tile.
This principal of tile removal can be used for any size or tile type.
This process should only be attempted by persons who are trained or experienced in the use of diamond cutting power tools.
Copyright: Lesley Durbin Jackfield Conservation Studio Nov 2014


